
We’ll discuss:
Getting started with React
What is UNPKG, NPM, CDN?
Why use a module bundler? What is Rollup?
Importing libraries using ES6 module syntax
Using JSX (javaScript XML) for SVG graphics
Deriving graphics coordinates programmatically
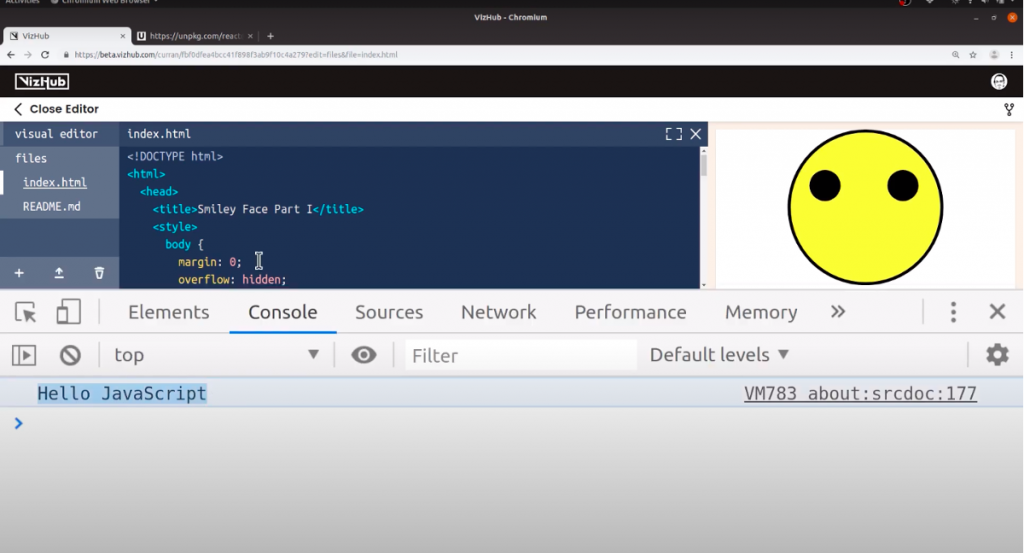
For our face, here’s where we left off last time.
We used some CSS to make those scroll bars go away, and to set the margin to 0.
<style>
  body {
    margin: 0;
    overflow: hidden;
  }
</style>
We used <svg> to make the background <circle>. This big yellow circle. And these two circles for the eyes.
<svg width="960" height="500">
  <circle
    cx="480"
    cy="250"
    r="245"
    fill="yellow"
    stroke="black"
    stroke-width="10"
  ></circle>
  <circle cx="350" cy="180" r="50"></circle>
  <circle cx="600" cy="180" r="50"></circle>
</svg>
But I was feeling a little frustrated that we couldn’t use math to figure out these coordinates. But I noted down these thoughts of what math we would want to use for defining these various coordinates.
<!--
      height / 2 - strokeWidth / 2
      centerX - eyeOffsetX
    -->
Getting started with React
What I’m gonna do next is use React to define this DOM structure, and we’ll pretty much be able to copy-paste our HTML into JSX, which sort of lets you write HTML inside JavaScript, but it also lets you sort of inject math or arbitrary JavaScript expressions.
The next step here is to use the React library. And the way VizHub works with libraries is that we can just include the <script> tag on the page, and then write some JavaScript that imports from that library.
The way I like to figure out the path for libraries is to use unpkg. If I just type unpkg.com/react and hit Enter, it gives me the common JS build. But let me just poke around here and see if I can get the browser build. The UMD (Universal Module Definition.) build is what we need. I think I’ll use this one. React production.min that weighs 13 kilobytes.
If I click through to View Raw, then it gives me this URL which I can use in a <script> tag in my program here. So in the <head> is where I’m gonna load this. I’m gonna make a new script tag begin script <script> end script </script> and then the source src attribute of this script tag will be that URL from unpkg.com.
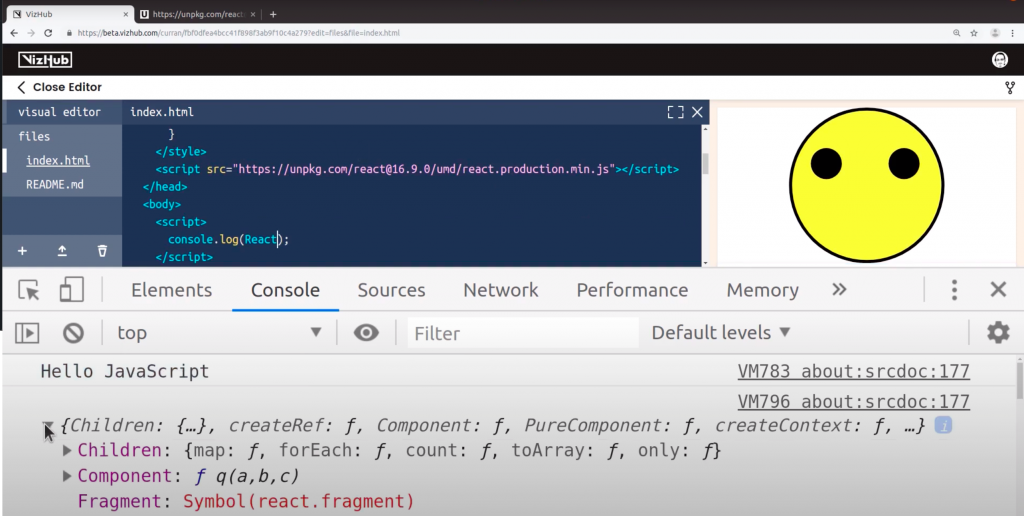
<script src="https://unpkg.com/react@16.9.0/umd/react.production.min.js"></script>
So now, we can access the React global by writing some JavaScript ourselves. Inside the <script> tag, we can write some JavaScript like console.log("Hello JavaScript!");
<script>
  console.log('Hello JavaScript!');
</script>
Now if I open the Developer tools with Ctrl+Shift + J, we see the output – Hello JavaScript.
What I really want to do is check that React is loading in here. And it should be a global variable called React in uppercase. So if I say console.log(React), there it is. There’s all this stuff. All the exports of React in a single global.
What is UNPKG, NPM, CDN?
Let me just stop and explain what is unpkg is all about. Nowadays, npm – Node Package Manager is the de-facto place where JavaScript libraries are hosted. You can go to npmjs.com and search for all sorts of libraries like React or D3. Each package has its own page here. If you were using node.js, you would say npm i — or npm install d3. But if you’re working in the browser like we are, you would use a CDN – a Content Distribution Network. A Content Distribution Network, also called Content Delivery Network, is where instead of just a single server serving the files, it’s a bunch of servers that are close to the people consuming them. It’s pretty much an efficient way of getting the files to your browser.
Unpkg is an open source project that is a global content delivery network, or CDN. For everything on NPM, it has this URL scheme where you can specify a package, a version, and a file. unpkg.com/:package@:version/:file
And they give this example of React. unpkg.com/react@16.7.0/umd/react.production.min.js
So that was a little detour of what unpkg is, and why we’re using it.
Why use a module bundler? What is Rollup?
The next step is to get to a place where we can start to use JSX with React. For that, we need a module bundler, and Vizhub uses rollup internally. Rollup is this open source project that understands JavaScript modules. It can combine modules together into a single output file that’s typically called a bundle. There’s a plugin for this that understands JSX, and transpiles the JSX into JavaScript, which needs to be done in order to really use React.
To get this going, we need to just create a file called index.js. To create a new file I’m going to click this little + over here in the bottom-left corner, and click new file, and then I’ll call it index.js and hit enter.
We can take our console.log(React) out of here, and put it into the index.js. Notice that bundle.js got created automatically. It gets created automatically from the content of index.js, and again this is using rollup internally. Now that we have bundle.js, we can change our <script> tag such that it just loads the content of bundle.js.
Importing libraries using ES6 module syntax
We can say <script src=“bundle.js”></script>, and now that we’re using this module bundler we can actually say import React from “react”; the package, using this syntax. So now if we take a look at the console, it’s printing out just the same as it was.
The next step here is to get that React boilerplate going, which I can never remember. So I’m just gonna Google for it. All right this is the React boilerplate, and I forgot we need ReactDOM as well. So I’m going to import ReactDOM from ‘react-dom’. And to use that we need to include another <script> tag on our page. And to figure out the URL I’m gonna go back to unpkg and just type react-dom, and again we’re getting the wrong build. So if I just poke around here, I can find the right build for the browser. The UMD react-dom-production.min.js is the one that we want. And if we click View Raw, we get this URL that we can then use in our page. So we can say <script src="https://unpkg.com/react-dom@16.9.0/umd/react-dom.production.min.js"></script> Now we should be able to say console.log(reactDOM), and it should print out something. Ok great, that worked.
So now we can start using React for DOM manipulation. Now it’s all coming back to me. This is what the boilerplate looks like. We get a rootElement where we say document.getElementById(‘root’) and then we call ReactDOM.render(<App />, rootElement); our app component into the root element. But first, we need this to be in place. document.getElementById is going to look for an element on the index.html page with this id of root, which is not there yet. So let me just create that. <div id=“root”></div>. So now we’ve got a div on the page that will come back for this query document.getElementById(‘root’).
Using JSX (JavaScript XML) for SVG graphics
But now we need an app component, so let me just create that right now. It’s just going to be a function that returns some JSX, and this is what JSX looks like. I’ll say..
const App = () => (
<h1>Hello JSX</h1>
)
All right, it worked!
If you’re new to JavaScript, there is a lot going on here. const is a way of defining variables, so we’re defining App as a variable whose value is a function, and this syntax here is the arrow syntax for creating functions. And if the body of a function is in parenthesis, it’s the same thing as a traditional, curly braces function body, and then saying return this JSX.
const App = () => { return (
<h1>Hello JSX</h1>
) }
But I’m gonna go with the more concise syntax for now. Now that we made it this far, we can take our SVG’s stuff from over here in index.html, and start translating it into JSX. I’m gonna start by expanding this comment to include all of our SVG so we won’t see it anymore, and I can take things bit by bit and convert them to JSX.
But I’m gonna go with the more concise syntax for now. Now that we made it this far, we can take our SVG’s stuff from over here in index.html, and start translating it into JSX. I’m gonna start by expanding this comment to include all of our SVG so we won’t see it anymore, and I can take things bit by bit and convert them to JSX.
I’m going to start by putting the first of our circles into JSX.
If I delete this <h1> and then paste that HTML, we get this useful error message – Unterminated JSX Contents. That means that we’re missing the closing </svg> tag, so we can add it, and that error should go away. And in JSX, this circle needs to be a self-closing thing, so I can just put a slash before the closing tag – and that problem should go away.
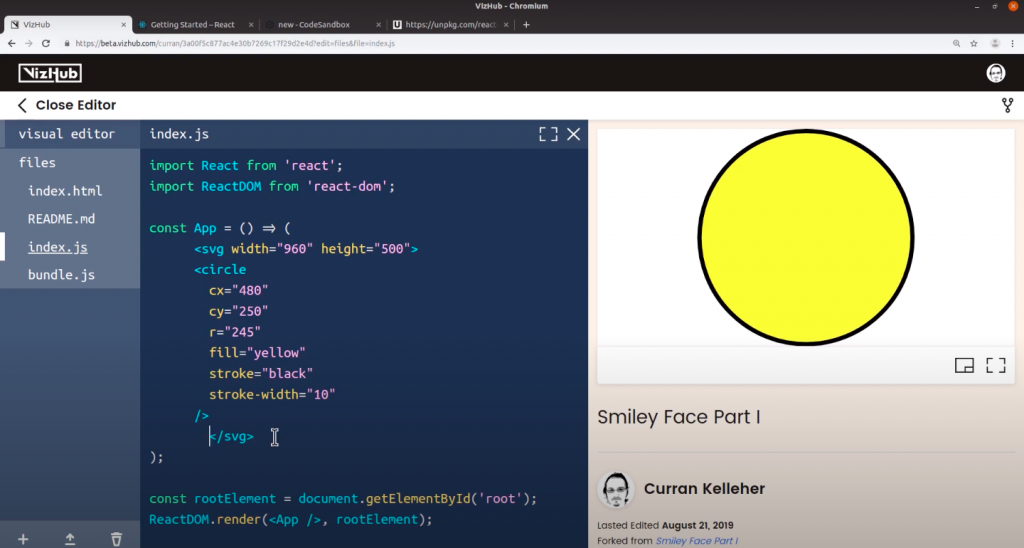
And boom! We have our circle. But now it’s getting created from JSX, not just HTML.
Let me just fix the indentation there so now we can start doing things programmatically. I’m gonna start by extracting width and height into variables outside of this app. I’m going to just make some variables.
const width="960"const height="500"
But since these are quoted, they’re gonna be strings and that’s not what we want. So I’m gonna just gonna remove these quotes around these things.
const width=960const height=500
Now we can do math on these, and we won’t get confusing results. Now that these variables exist, we can use them in our JSX in place of these strings. So I’m going to delete that 960, and then in JSX we can use curly braces to sort of escape out into JavaScript so whatever I put inside of these curly braces, it can be any JavaScript. So I’m gonna do the same for height.
<svg width={width} height={height}>
And now we can define all these numbers in terms of width and height. What did we want cx to be? Let me go back to my comments and just bring those over here into our index.js.
In JavaScript, the comments look like this. //
Deriving graphics coordinates programmatically
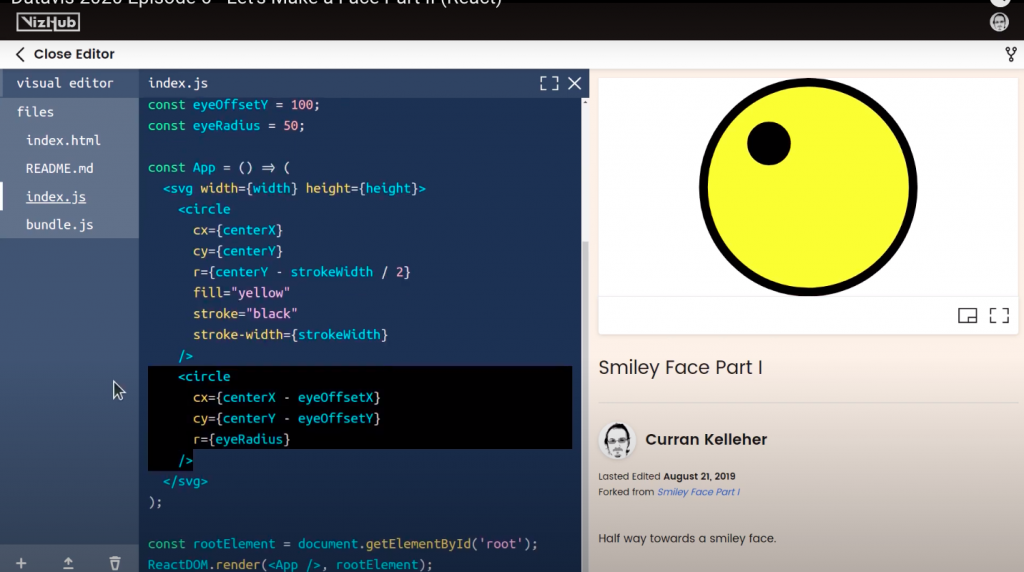
I had this notion that there should be a variable called centerX, so let’s go ahead and define that. const centerX= well to put in the center it needs to be width/2. Now, instead of 480, I could say cx={centerX}. Just like that, we can do the same for cy. centerY= height / 2 . And then we can set cy to be centerY. cy={centerY}
And what should the radius be? I think that was this comment here – r should be equal to this stuff – height / 2 - strokeWidth / 2. We don’t have strokeWidth defined, so let me just define that – strokeWidth is going to be.. well it’s 10 down here, so let me remove that defined strokeWidth to be 10 here. const strokeWidth = 10. And then define the stroke-width attribute to be the value of the strokeWidth variable.
strokeWidth={strokeWidth}
Okay so height/2 is centerY, so we can simplify the radius to be CenterY - strokeWidth/2 and then I can just take this expression here and set that to be the value for r.
Now things sort of magically cascade, so I could change the value of strokeWidth to say 30, and notice how the circle still goes right exactly up to the edge. That’s because all of this is defined mathematically, programmatically. So far so good.
Now let’s make our eyes. I think I’ll change that back to 20. Going back to our index.html, I’m gonna take just one of our eyes – I think it’s the left eye. I’m gonna paste that right here next to that first of our circles. And there’s our left eye. All right, so what is this 350? That’s the x-coordinate of our eye. And that’s what this thought was – centerX - eyeOffsetX. So we should be able to say cx={centerX - eyeOffsetX}. But we don’t have eyeOffsetX defined, so I’m gonna go ahead and make a new variable, and set it to say 50. const eyeOffsetX = 50; So now I’m going to take this idea and make it a reality.
The cx of our left eye should be centerX - offsetX. cx={centerX - offsetX}
All right, see that?! Maybe we need a little more of an offset, let’s say 90.
const eyeOffsetX = 90
All right! now it’s moving around. Actually, I’m noticing, we could simplify this to just make it a self-closing circle tag there. So now let’s deal with cy. This should be quite similar. I guess it should just be cy={centerY - eyeOffsetY}, and we don’t have that variable quite yet, so let me just make a new variable eyeOffsetY – const eyeOffsetX = 90, and there we have it.
So let me just test if we increase this to say 110. Our eye moves up a little bit. Let’s keep it at say 100.
All right the last remaining thing is the radius of this eye, and I just want to make it so that we could control the radius of both eyes by setting one variable value. So I’m just gonna make this defined by a variable as well. I’ll call it eyeRadius. And we can define eyeRadius to be 50. const eyeRadius = 50;
<circle
 cx={centerX - eyeOffsetX}
 cy={centerY - eyeOffsetY}
 r={eyeRadius}
>
Okay, now we should be able to pretty elegantly create the other eye. So I’m going to copy-paste that, and the only difference should be, instead of subtracting eyeOffsetX from centerX, we should be adding it. So I’ll just change that minus to a plus, and boom! We’ve got two eyes!
<circle
 cx={centerX + eyeOffsetX}
 cy={centerY - eyeOffsetY}
 r={eyeRadius}
>
And now if we want to make both eye smaller, we could just change the eyeRadius and be done with it.
//filename: index.js

import React from 'react';
import ReactDOM from 'react-dom';

const width = window.innerWidth;
const height = window.innerHeight;
const centerX = width / 2;
const centerY = height / 2;
const strokeWidth = 20;
const eyeOffsetX = 90;
const eyeOffsetY = 100;
const eyeRadius = 40;
const mouthWidth = 20;
const mouthRadius = 140;

const App = () => (
  <svg width={width} height={height}>
    <g transform={`translate(${centerX},${centerY})`}>
      <circle
        r={centerY - strokeWidth / 2}
        fill="yellow"
        stroke="black"
        stroke-width={strokeWidth}
      />
      <circle
        cx={-eyeOffsetX}
        cy={-eyeOffsetY}
        r={eyeRadius}
      />
      <circle
        cx={eyeOffsetX}
        cy={-eyeOffsetY}
        r={eyeRadius}
      />
    </g>
  </svg>
);

const rootElement = document.getElementById('root');
ReactDOM.render(<App />, rootElement);
<!DOCTYPE html>
<html>
<head>
<title>Smiley Face Part II</title>
<style>
body {
margin: 0;
overflow: hidden;
}
</style>
<script src="https://unpkg.com/react@16.9.0/umd/react.production.min.js"></script>
<script src="https://unpkg.com/react-dom@16.9.0/umd/react-dom.production.min.js"></script>
</head>
<body>
<div id="root"></div>
<script src="bundle.js"></script>
</body>
</html>That’s all for Let’s Make a Face Part II. Stick around for the next episode, where we’re going to add the mouth of our face finally using D3.